

Follow these easy steps on how to propagate Persian Shield plants so your shade or part sun garden can be a beautiful sea of iridescent green and purple throughout the growing season!
Persian shield are easy plants to propagate because they are relatively hardy, fast growers. You can start with very small plants and by the end of the season have very sizeable specimens to fill your garden bed.
The things you will need to try your hand at propagating Persian Shield are as follows:
Some type of planting container.
I recommend a sectioned container like a seed starting planter or one you would get from purchasing vegetable seedling. Sectioned off because once they start growing, you will not have to worry about the roots tangling together from each cutting.
Rooting medium.
Preferably well-draining, soilless. Perlite will work. Ground up bark like mulch if its fine enough will work too.
Sharp and sterilized pruning shears or a blade of some type for taking the cuttings.
Rooting Hormone.
This isn’t always necessary, but it will give you a better success rate overall. Any brand will do. I have had good luck with several. It comes in powder form mostly but also gel. I have personally tried the gel but I certainly would like to try it. It’s supposed to stick to your cuttings better.
If you’d like to see a video of this easy technique check out my HOW TO TAKE CUTTINGS FROM A PERSIAN SHIELD VIDEO.
Try to take your cuttings between May and August. This is the time of year they seem to be growing the most. I take mine in July and August when it is very hot and humid here and the roots take off in like 3 or 4 days usually. You can really take them anytime as long as your “mother” plant is established enough to survive some branches being removed.
First, get your containers ready. Fill them a couple of inches below the edge like you would a potted plant, because that’s what it will become. It also keeps it from being messy when you water them.
Wet down your rooting mix. If it drains well, you can soak it through. You want it to be very damp but not standing water.
Next, I like to make a hole in the damp rooting mix to place the cuttings in. Making a “pre” hole will reduce damage you may inflict on the cutting. Making a hole will also allow the rooting hormone to stay on your cutting and not be rubbed off by the surrounding mix.
Ok, here’s the way I do it a little different than anyone else in the universe.
Most every video or website will tell you to cut below a node.

It is best to take a cutting just ABOVE a node.
That way you don’t have a bare leafless nub sticking up out of your plant. It is a technique I use to simultaneously pinch the plant for new fuller growth and also to get a cutting. So when choosing your cutting, drop down one more node.

Take your cuttings by clipping relatively newer growth anywhere from 4 to six inches. Depending on how long your internodes are, the sections between nodes, will determine your length.
I would say, cut twice as many cuttings as you want plants. You never know how many will actually take root.

It’s very disheartening to start over, because it can take some time depending on your weather. I have done dozens of cuttings and not had one fail yet. Knock on wood.
It is always better to have more plants than you want than not enough !
Remove the leaves from the bottom leaf node. This is mainly where your roots will come from.
If the stem is not damp, dip it in a bowl of water and shake off the excess.
Carefully dip the stem in your rooting hormone, being sure to cover the node and a little ways up the stem. If your using powder, shake off the excess. If using gel just let it drip off a bit.

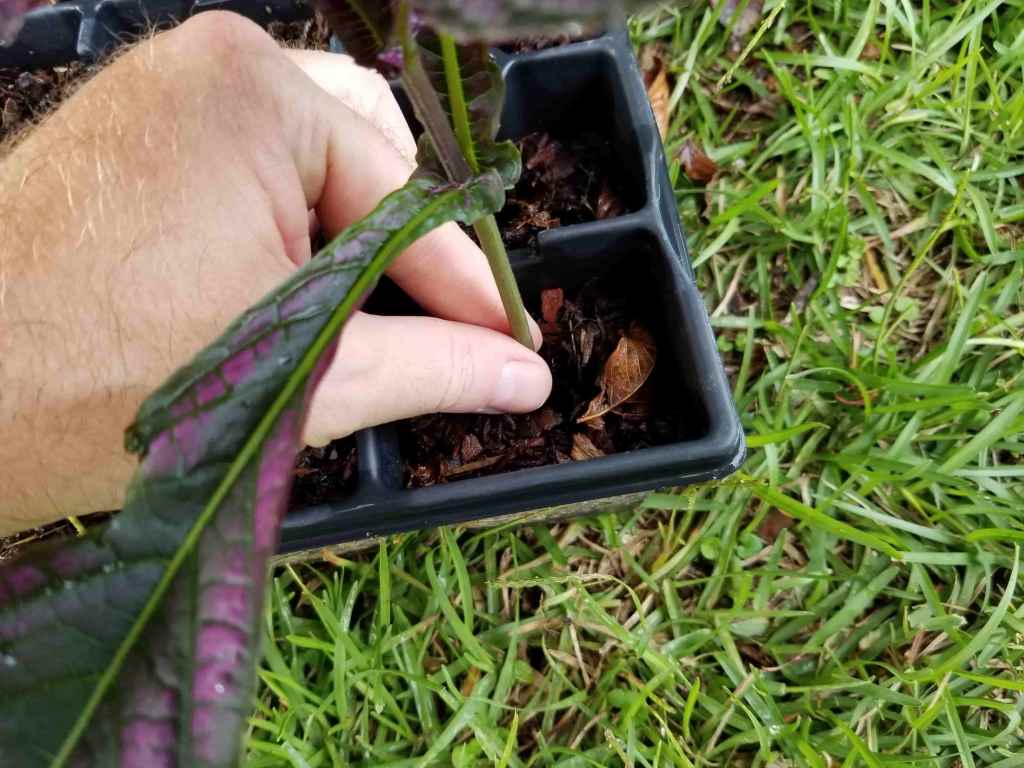
Stick them in the potting mix that you dampened and pre-poked holes.

Firmly press the rooting medium around the base of the stem to hold it in place.
Repeat these steps until your heart is content!
Your cuttings may become droopy in the meantime, but don’t worry too much. Once you get them all done and gently water them to settle the air pockets, they should perk right back up within the next few hours.
Sometimes they will droop for days but just give them time.
At this point your job is to keep them moist daily. This is something I usually don’t have to worry about in the high humidity of southern Alabama, but in other places you may have to resort to some other means of keeping the moisture in.
This can be accomplished by placing your cuttings in a storage container, with the lid on. I have used these in the past during a colder time of year. It is also best to use a clear one , so you get sunlight and humidity.
Placing a plastic bag or any type of clear plastic container over the cuttings can help to keep the humidity high.
Here in Alabama, I can place the cuttings in a shaded area and get pretty good results most of the time.
By the end of summer, you should have some nice sized Persian Shield plants to place in your garden or in pots. They will live up through to the first frost. They are pretty resilient and will handle cold weather. Mine have come back after freezing to the ground.
Persian Shield can be grown as a root-hardy perennial in zones 8 to 11 and an annual in colder climates.
If you’ve never tried propagating before, Persian Shield seem to be relatively easy to get started learning the process because of their defined segments and nodes and ability to grow quickly.
I use this method for many plants in my garden. Check out my other propagation posts on my blog, or some instructional videos on my YouTube channel and be sure to subscribe while you’re there to keep informed of any new videos!


